

Symfony bundle for eCommerce platforms: No one likes to reinvent the wheel over and over again. People associated with web development or eCommerce services are no exception here. Exploring technologies and solutions that enable faster goal achievement is a legitimate pursuit. Someone already familiar with Symfony, tasked with developing eCommerce applications, would naturally seek a solution that not only harnesses the power and stability of Symfony but also minimizes the time and effort spent on recreating eCommerce functionalities from scratch.
This is where Sylius comes into the picture, offering an intuitive extension of Symfony that accelerates development speed and unlocks a plethora of eCommerce features. Let's dive deeper into how Sylius seamlessly combines the strengths of Symfony with its tailored approach to eCommerce development. First and foremost, we'll reveal the components that underpin the main characteristics of Sylius. It is worth noting that the examples shown below might not represent state-of-the-art code, as the intention is to present concepts in a simple and concise manner. The list of our topics is as follows:
Without further due, let’s get into the first one.
https://bitbag.io/blog/symfony-framework-a-great-choice-for-php-web-development
Services and Dependency Injection
One of the most powerful components of Symfony is certainly a must-have in a robust eCommerce solution like Sylius! It provides extensibility and overriding capabilities. Additionally, it excels at combining multiple services together through the use of tags. Let's explore some real-life examples of its use. The scenario of our example is presented as follows:
We have a shop that, up to this day, was selling only one type of a product. The logic responsible for checking shipping eligibility is stored in ShippingController::index. However, starting from now on, we would like to introduce another type of product that would require some different checking logic.
Our shipping-checking logic up to this point presented itself as so:
 public function index(ProductInterface $product): JsonResponse
   {
//  get current user data etc…


       $isShippingElegible = false;


       if (0 <= $product->getWeight() && 5000 > $product->getWeight()){
           $isShippingElegible = true;
       }


//  take some action based on the value inside the shipping eligible flag…
So at the moment, we allow shipping for products that weigh from 0 up to 5000 units of weight. However, at this point, we want to introduce brand new VIRTUAL products that also won’t weigh anything but will be distributed digitally and do not need shipping. Let’s solve this problem while utilizing the Dependency Injection Symfony component.
First, let’s create an interface for our new checking logic.
interface RuleCheckerInterface
{
   public function supports(ProductInterface $product): bool;


   public function isEligible(ProductInterface $product): bool;
Okay, now we can recreate the check logic that was already present in ShippingController::index:
class SimpleProductWeightRuleChecker implements RuleCheckerInterface
{
   public function supports(ProductInterface $product): bool
   {
       return 'simple' === $product->getType();
   }
   public function isEligible(ProductInterface $product): bool
   {
       return 0 <= $product->getWeight() && 5000 > $product->getWeight();
   }
}
Now, let’s create a brand new check responsible for checking if our product is virtual or not.
class VirtualProductWeightRuleChecker implements RuleCheckerInterface
{
   public function supports(ProductInterface $product): bool
   {
       return 'virtual' === $product->getType();
   }
   public function isEligible(ProductInterface $product): bool
   {
       return false;
   }
}
At this point, checks are all ready to be used in our controller. Let’s utilize tagged iterators to bulletproof ourselves in case of new product types are being introduced. (super-heavy ones, for example):
App\Service\SimpleProductWeightRuleChecker:
   tags: ['app.weight_rule_checker']


App\Service\VirtualProductWeightRuleChecker:
   tags: ['app.weight_rule_checker']


App\Controller\ShippingController:
   arguments:
       - !tagged_iterator app.weight_rule_checker
Using Symfony's tag functionality, we can tell our container to create an iterator containing services with a specified tag. Finally, we can rewrite our controller logic to incorporate our new iterator logic:
   public function index(Product $product): JsonResponse
   {
//      get current user data etc...


       $isEligible = $this->isEligible($product);


//      take some action based off of value inside shipping eligible flag...


       return $this->json([
           'isEligible' => $isEligible,
       ]);
   }


   private function isEligible($product): bool
   {
       foreach ($this->weightRuleCheckers as $weightRuleChecker){
           if ($weightRuleChecker->supports($product)){
               return $weightRuleChecker->isEligible($product);
           }
       }


       throw new \Exception('No weight checker supporting product was found');
   }
We have seen that thanks to Symfony's Dependency Injection component, it is fairly easy to create code that's easy to read and extend. We could imagine that using such a solution in an eCommerce application would boost our development speed and time saving by a lot. And we would be right. What we have done up to this point is actually a simplified version of how Sylius manages weight-checking logic. If You want to dig deeper into Sylius internals, search for services tagged with “sylius.shipping_method_rule_checker”.
Doctrine
In a lot of cases regarding using Symfony, Doctrine’s DBAL and ORM are the default libraries used for managing database connections, queries, etc. In this case, Sylius is no exception. It offers a familiar experience for Symfony users by providing a convenient way to obtain resources through its EntityRepository, which is actually an extension of Doctrine's EntityRepository. By default, Doctrine is used in yet another powerful Sylius component which is Grid.
Let’s see how easy it is to create a resource and basic grid for its management. We will start by creating an entity “Car”:
Disclaimer: To produce the example shown below, it is required to set up a Sylius project first.
#[ORM\Entity(repositoryClass: CarRepository::class)]
class Car implements CarInterface
{
   #[ORM\Id]
   #[ORM\GeneratedValue]
   #[ORM\Column]
   private ?int $id = null;


   #[ORM\Column(type: 'string')]
   private ?string $brand = null;


   #[ORM\Column(type: 'string')]
   private ?string $model = null;


   public function getId(): ?int
   {
       return $this->id;
   }
Note: It is crucial to make our entity implement the Sylius ResourceInterace. Here CarInterface extends ResourceInterface:
interface CarInterface extends ResourceInterface
Getters and setters methods were cut out for conciseness.
Now we can register new Sylius resources by adding a few config nodes to our configuration tree:
sylius_resource:
   resources:
       app.car:
           driver: doctrine/orm
           classes:
               model: App\Entity\Car
sylius_grid:
   grids:
       app_admin_car:
           driver:
               name: doctrine/orm
               options:
                   class: App\Entity\Car
           fields:
               brand:
                   type: string
                   label: brand
               model:
                   type: string
                   label: model
           actions:
               main:
                   create:
                       type: create
               item:
                   update:
                       type: update
                   delete:
                       type: delete
One last step is to tell Sylius about the route we want to visit in order to see/edit our newly created resource:
app_admin_car:
   resource: ,
       alias: app.car
       section: admin
       templates: "@SyliusAdmin\\Crud"
       redirect: update
       grid: app_admin_car
       vars:
           all:
               subheader: app.ui.car
           index:
               icon: 'file image outline'
   type: sylius.resource
   prefix: /admin
Everything is ready! Let’s see what we have created. Spin up the server and visit “/admin/cars” path:
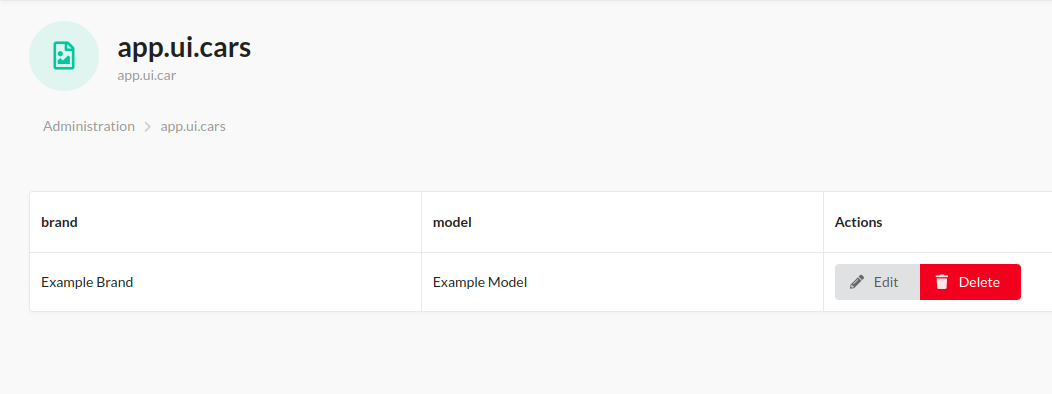
Just by utilizing basic Sylius Resource capabilities with under-the-hood Doctrine functionalities, we were able to create a basic CRUD GUI with minimal effort. What about basic filtering capabilities? We can implement it as easy as previously by adding a sub-entry to our grid’s config:
sylius_grid:
   grids:
       app_admin_car:
           filters:
               brand:
                   type: string
                   label: sylius.ui.brand
Which results in:
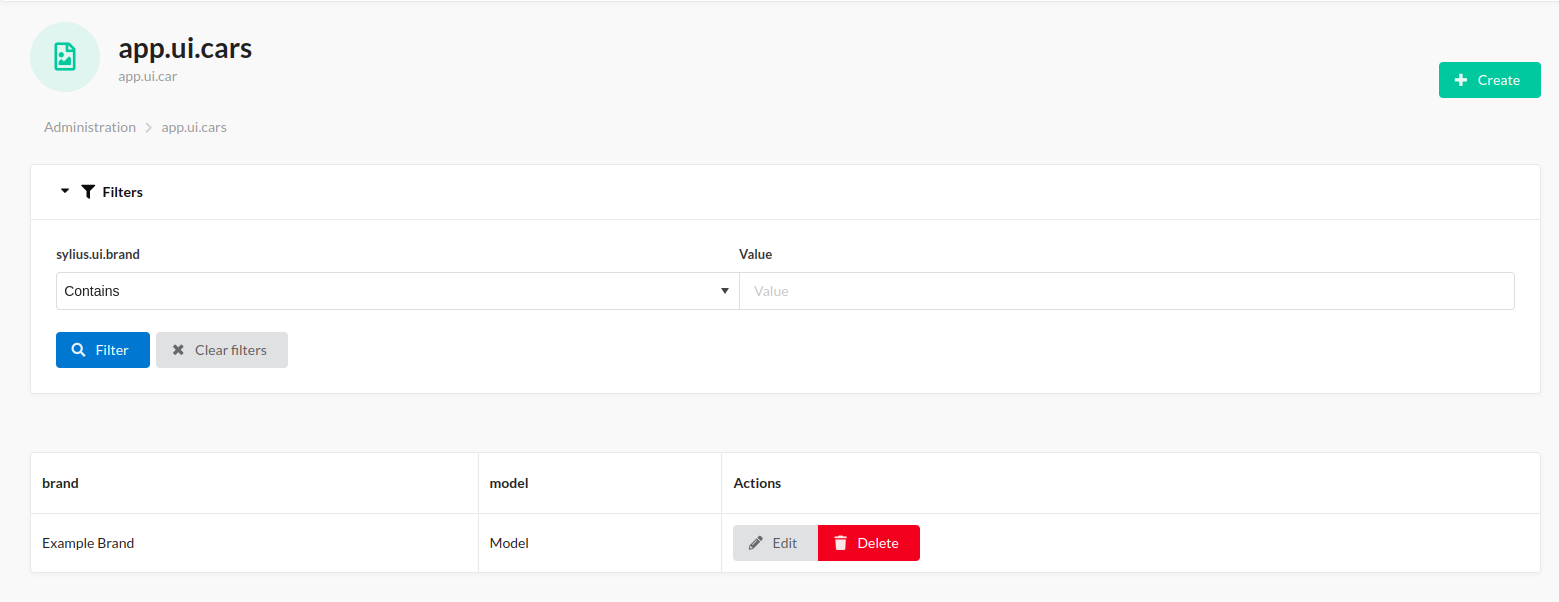
As we have seen, Sylius utilizes powerful Doctrine libraries to speed up development time significantly. While staying relatively close to the standard Symfony/doctrine development approach.
{{cta-technology-symfony="/comp/cta"}}
Routing
When it comes to routing, Sylius went a little beyond what's usually seen in the Symfony ecosystem. To enable more flexibility and customization, the Sylius team created a custom route loader that is responsible for reading routes that have a specific ‘sylius.resource’ type assigned. What’s quite uncommon is the use of ‘,’ character, which in this case allows the resource loader to obtain a plethora of additional parameters necessary for Sylius route generation.
app_admin_car:
   resource: ,
       alias: app.car
       section: admin
       templates: "@SyliusAdmin\\Crud"
       redirect: update
       grid: app_admin_car
       vars:
           all:
               subheader: app.ui.car
           index:
               icon: 'file image outline'
   type: sylius.resource
   prefix: /admin
When it comes to standard route generation, Sylius does not change much - just a little… Below we can see the standard route configuration, with one non-standard “_sylius” key:
sylius_shop_register_after_checkout:
   path: /register-after-checkout/{tokenValue}
   methods: [GET]
   defaults:
       _controller: sylius.controller.customer::createAction
       _sylius:
           form: Sylius\Bundle\CoreBundle\Form\Type\Customer\CustomerRegistrationType
           factory:
               method: ['expr:service("sylius.factory.customer_after_checkout")', 'createAfterCheckout']
               arguments:
                   - 'expr:service("sylius.repository.order").findOneByTokenValue($tokenValue)'
           template: "@SyliusShop/register.html.twig"
           event: register
           redirect:
               route: sylius_shop_account_dashboard
           flash: sylius.customer.register
Such a construct is used to pass additional parameters to controllers without going through very strict Symfony route keys validation. As we can see, the Sylius team introduced some modifications that may require some specific Sylius knowledge. Nonetheless, we still can see underlying Symfony logic that’s a foundation of the whole Sylius framework.
Useful links to the Symfony e-commerce bundle topic:
<div class="ml-form-embed"
data-account="2253895:i2a9g5f0y9"
data-form="5911792:o7h9l2">
</div>
