
.png)
Building a flexible product configurator in Sylius opens up countless possibilities for the eCommerce store. While product variants work great for predefined options like sizes and colors, they fall short when customers need truly custom configurations. Whether you're running a print-on-demand business where customers upload their own designs, managing a manufacturing shop that cuts materials to specific dimensions, or selling personalized jewelry with custom engravings - a robust configurator system becomes essential.
The configurator we're building today serves as a foundation that adapts to virtually any business need. Instead of being locked into rigid variant structures, you'll have the flexibility to let customers input custom text, select from dynamic options, or even upload files. The beauty lies in its extensibility - once you understand the core architecture, adding new configuration types becomes straightforward.
What makes this approach particularly powerful is its reusability. Create one configurator for custom t-shirt text, assign it to your entire apparel collection, then build another for material specifications that works across your industrial products. This system grows with your business while maintaining clean, manageable code.
Adding entities
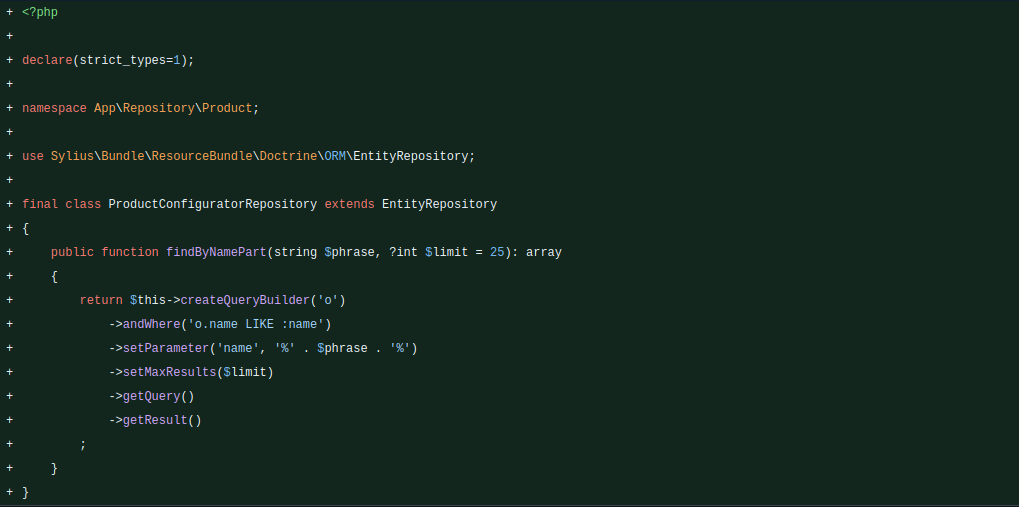
The first thing we need in order to implement a configurator in our shop is to add entities. We’ll start by adding <kbd>src/Entity/Product/ProductConfigurator.php</kbd>:
<divclass="cms-gallery"data-images="https://cdn.prod.website-files.com/63f739b97c9eda99f0b526ff/68ef5ea35316fa79cfad5880_obrazek%201.%20.png,https://cdn.prod.website-files.com/63f739b97c9eda99f0b526ff/68ef5ea2a9b758f2b6a1a823_obrazek%202%20.png"></div>
As you can see, we’re adding a name for our configurator as well as options which we’ll be adding next in the file <kbd>src/Entity/Product/ProductConfiguratorOption.php</kbd>:
<divclass="cms-gallery"data-images="https://cdn.prod.website-files.com/63f739b97c9eda99f0b526ff/68ef5fec137ff4f2d1776278_3.png,https://cdn.prod.website-files.com/63f739b97c9eda99f0b526ff/68ef5fecf73ee889d75c5983_4.png,https://cdn.prod.website-files.com/63f739b97c9eda99f0b526ff/68ef5fec5871fb56a253c700_5.png"></div>
In this class we’re adding label for our configuration option as well as code which will be used for identifying it, type for type of option which can be text, number, or custom, whatever our heart desires, there’s also configuration field which will hold any custom configuration required, for example if we added select list option, and lastly we add relation to configurator.
Next up, we need to add our configurator class as a relation to the product class:

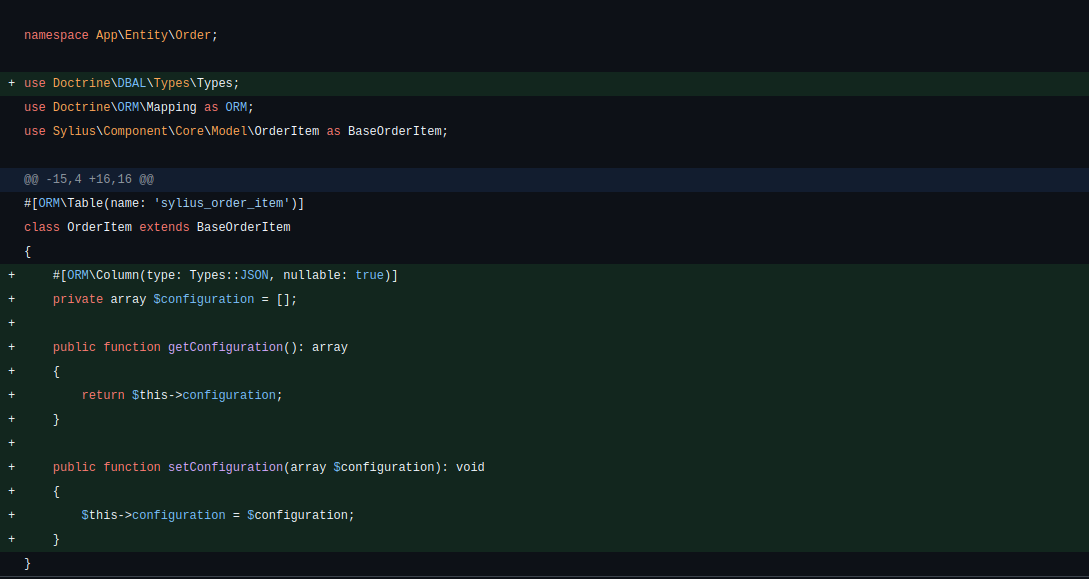
We also need to add a configuration field to <kbd>OrderItem</kbd> that will hold configuration data from our configurator:
In these examples, I’ve been using Attributes for database configuration, which need to be enabled by modifying <kbd>config/packages/doctrine.yaml</kbd>, but the changes can also be adapted for use with annotations or xml files.
Now we can create a migration using <kbd>bin/console d:m:diff</kbd> command, which will create a migration with all necessary changes for us.
Sylius Grid
Next, we need to add our configurator as a Sylius grid so that we can easily edit configurators. To do this, we add such grid:
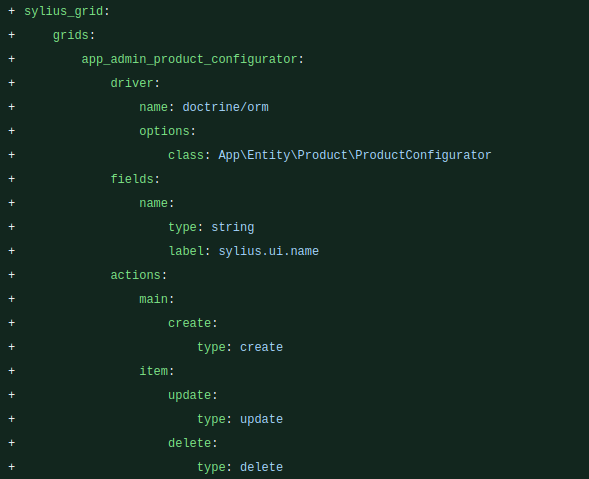
This will allow us to list configurators by name as well as add, edit, and delete them.
We also need to add routes for our new grid:
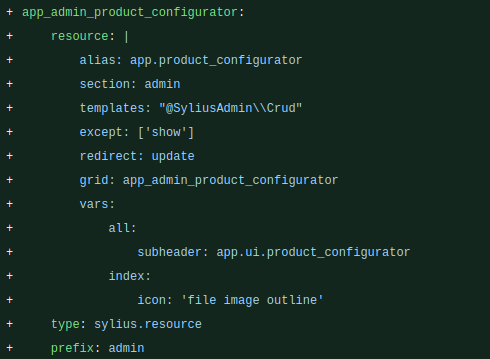
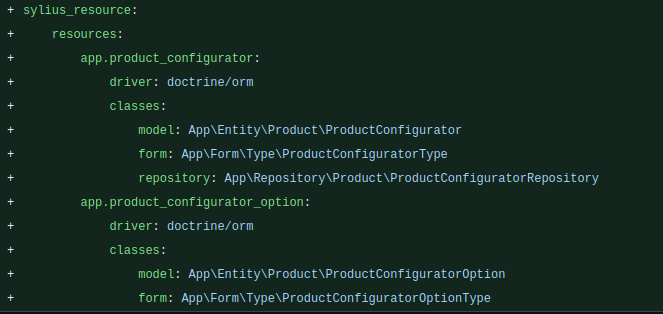
And lastly, we add Sylius resource:
We also need to add all the necessary translations:
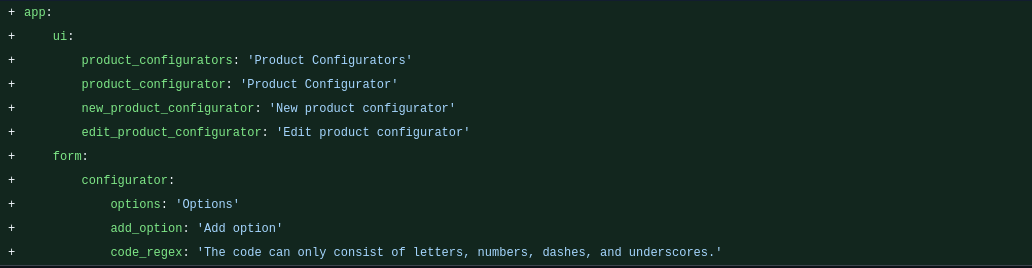
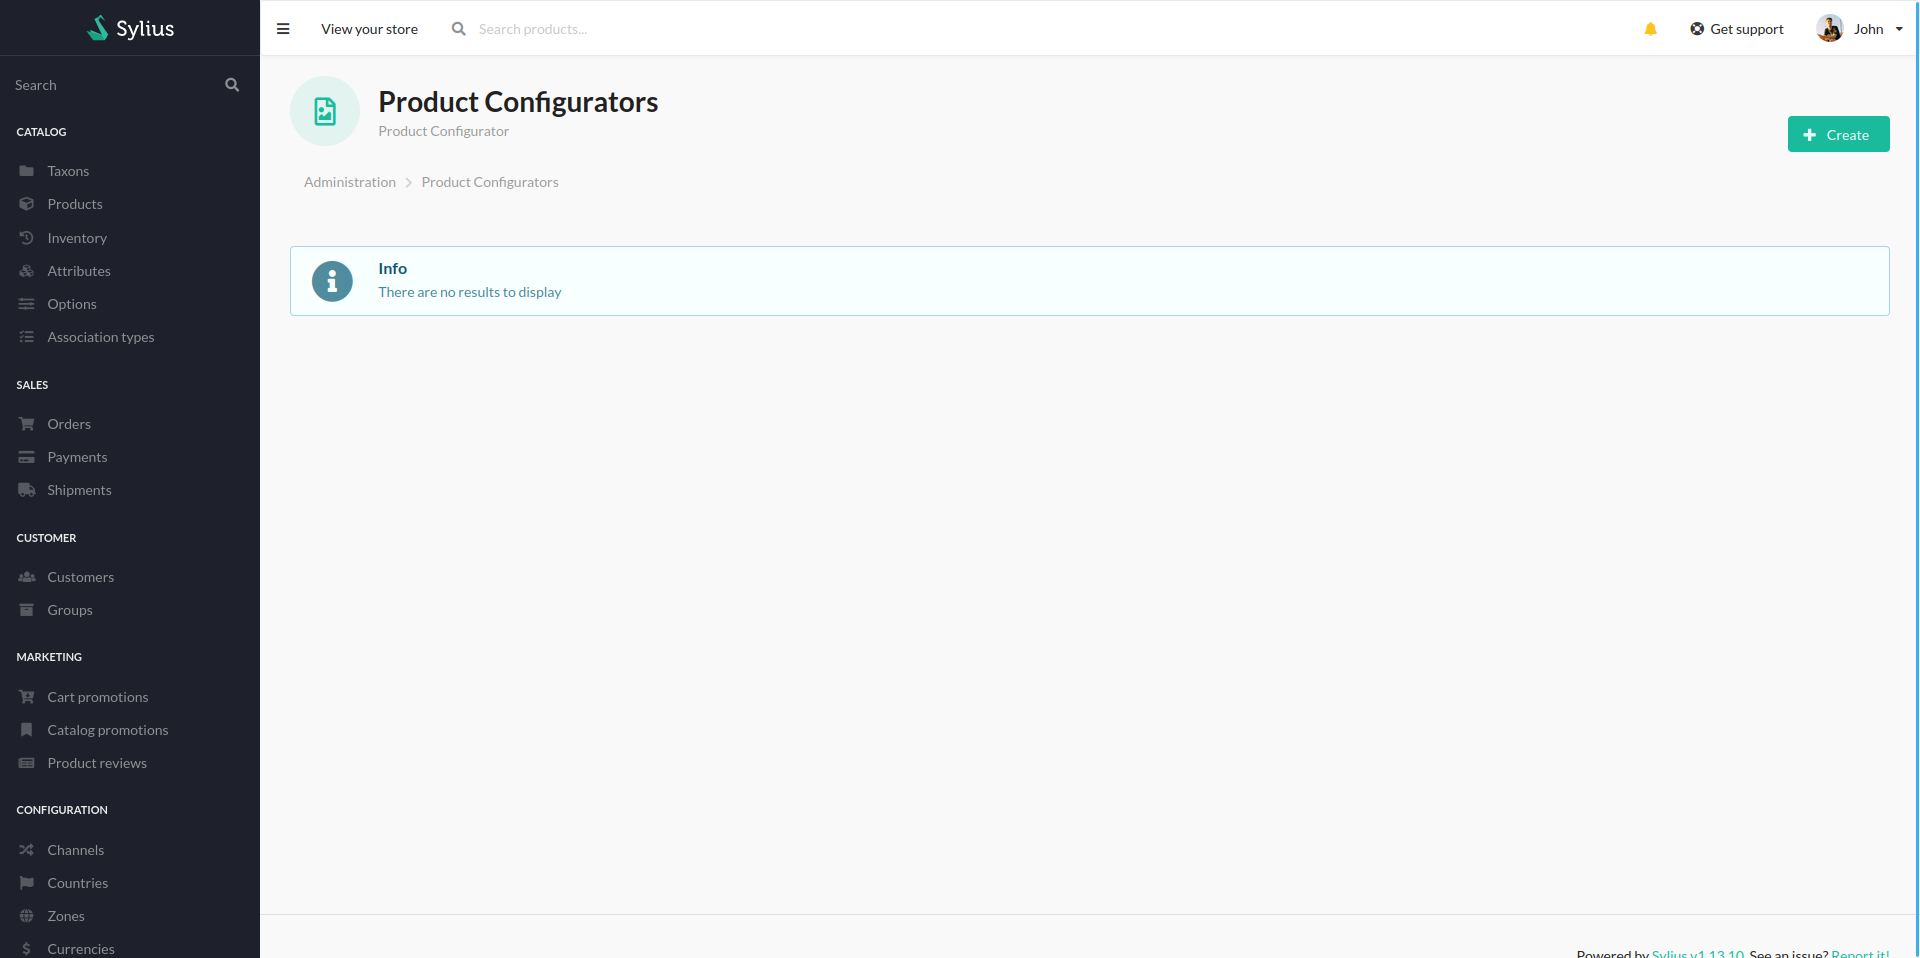
Now we should be able to access the configurator grid page via URL <kbd>/admin/product-configurators/</kbd>
Adding form
The next step on our adventure is implementing all necessary forms. We’ll start by adding <kbd>src/Form/Type/ProductConfiguratorType.php</kbd>:

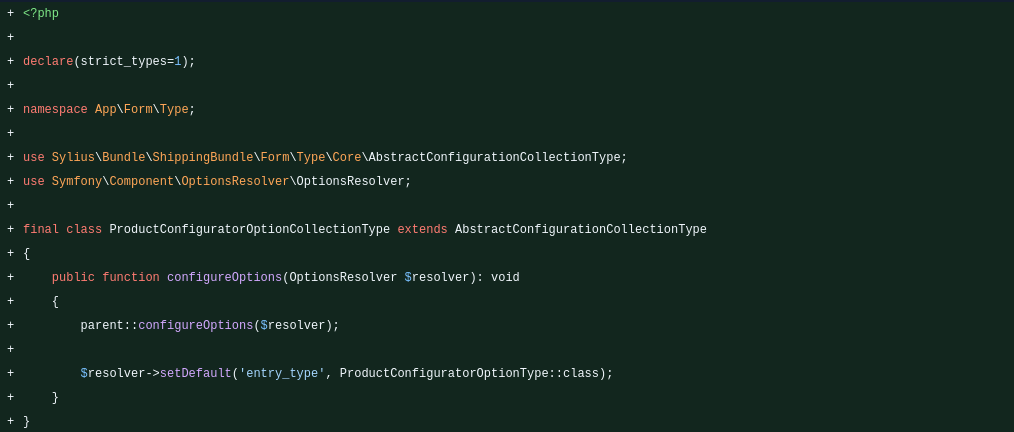
Here, we add the configurator’s name field as well as the configurator options collection, which we will need to add next in <kbd>src/Form/Type/ProductConfiguratorOptionCollectionType.php:</kbd>
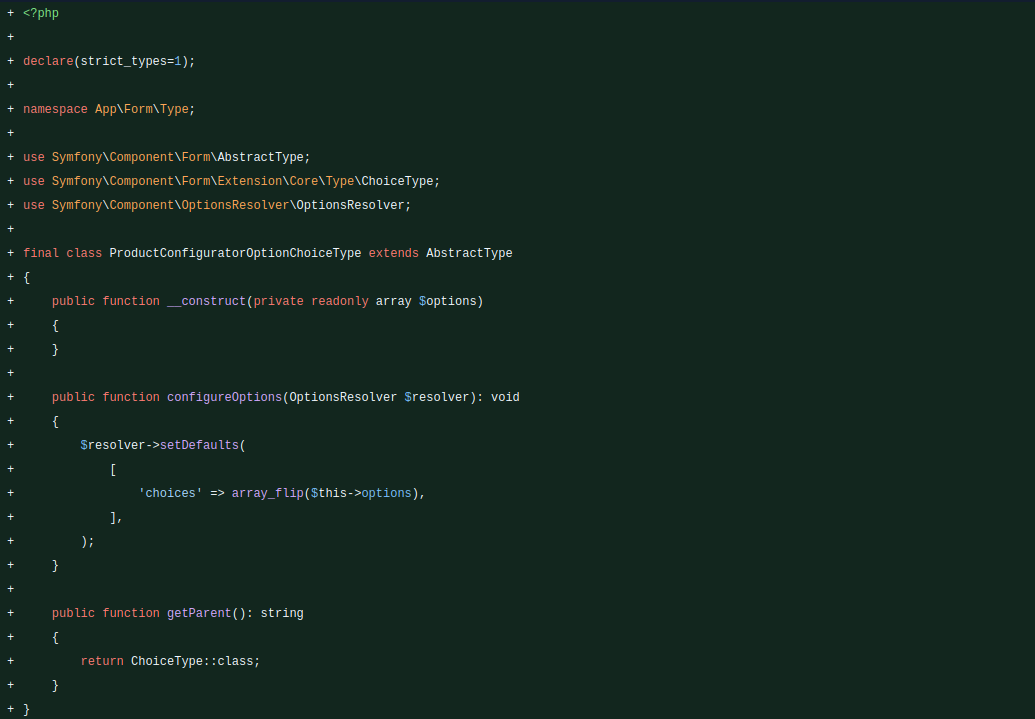
After which, we need to add <kbd>src/Form/Type/ProductConfiguratorOptionChoiceType.php:</kbd>
And lastly, we need to add <kbd>src/Form/Type/ProductConfiguratorOptionType.php</kbd>:
<divclass="cms-gallery"data-images="https://cdn.prod.website-files.com/63f739b97c9eda99f0b526ff/68ef6686cbbddd1230eaa727_16.png,https://cdn.prod.website-files.com/63f739b97c9eda99f0b526ff/68ef6686594a6fc475191d6d_17.png,https://cdn.prod.website-files.com/63f739b97c9eda99f0b526ff/68ef681ea2a821d48b7d6fb0_image31.png"></div>
Now, <kbd>ProductConfiguratorType</kbd> for the options field adds uses <kbd>ProductConfiguratorOptionCollectionType</kbd>, which will allow us to add multiple options to our configurator. Now <kbd>ProductConfiguratorOptionCollectionType</kbd> uses <kbd>ProductConfiguratorOptionType</kbd>, which, in turn, for its type field, uses <kbd>ProductConfiguratorOptionChoiceType</kbd>, which, for its options, uses special sauce that we’ll be adding soon. <kbd>ProductConfiguratorOptionType</kbd> also adds fields such as label and code. In events, it’s adding our configurator option’s fields.
Now we need to add our configurator options. To do that, we need to create <kbd>src/Form/Type/ProductConfigurator/Option/ProductConfiguratorOptionFormInterface.php</kbd>, which will be implemented by all the available options, and our first option is going to be <kbd>src/Form/Type/ProductConfigurator/Option/TextConfigurationType.php</kbd>:
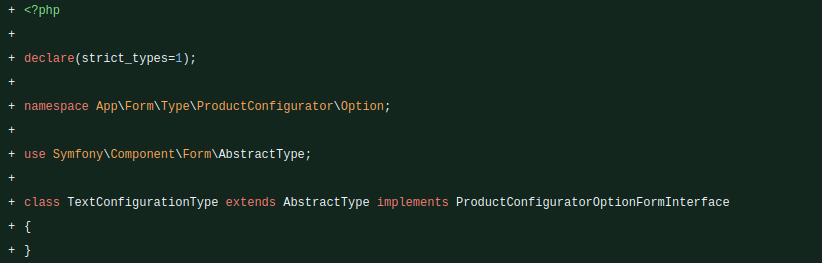
It is quite simple, but we don’t need any special fields. If you want to create a custom option with custom fields, you can add <kbd>buildForm</kbd> here and add all of your fields.
Special sauce
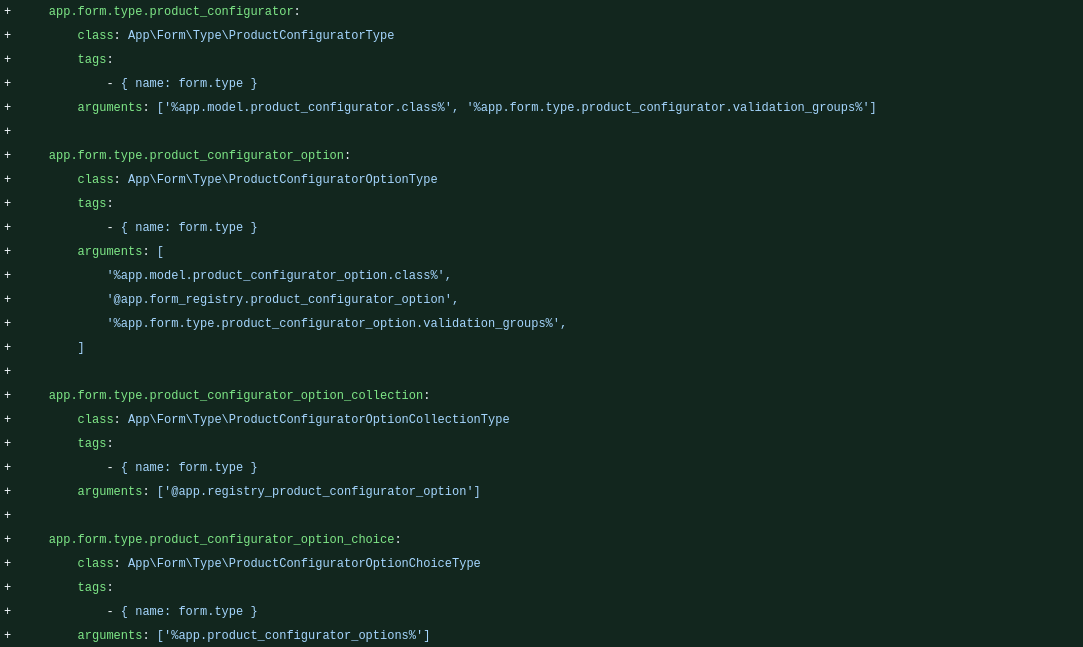
Now we will be registering all of our forms as well as adding the custom sauce needed for option type selection to work. To do that, first, we need to register our forms as services:

Now this won’t work yet, our <kbd>ProductConfiguratorOptionChoiceType</kbd> uses <kbd>app.product_configurator_options</kbd>, which doesn’t yet exist. To create it, we need to create a compiler pass <kbd>src/DependencyInjection/Compiler/RegisterProductConfiguratorOptionCheckersPass.php</kbd>:
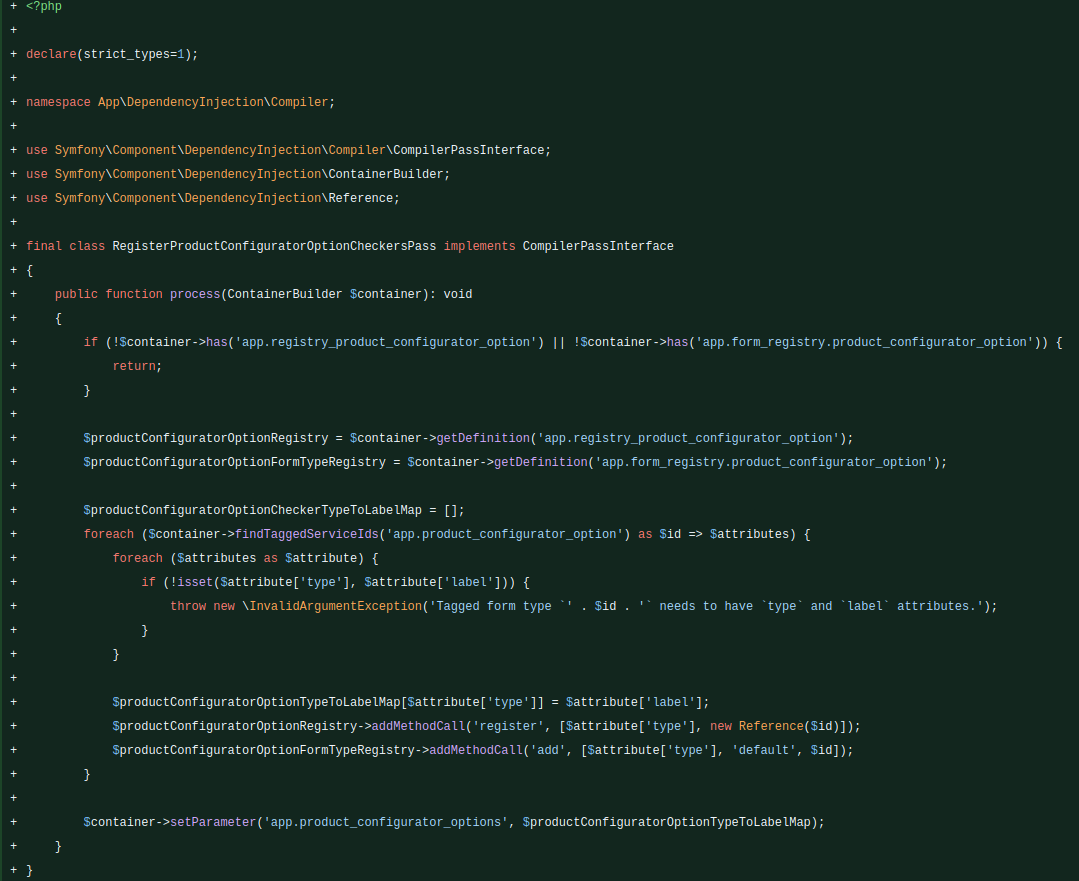
Now in our compiler pass, we’re checking for <kbd>ServiceRegistry and FormTypeRegistry</kbd> we’ve registered earlier, and we’re fetching every form tagged <kbd>app.product_configurator_option</kbd> and registering it with registries, as well as adding our missing <kbd>app.product_configurator_options</kbd>.
We also need to register our compiler pass with our kernel in <kbd>src/Kernel.php</kbd>:

And now we should be able to configure our configurator properly:

It’s a product configurator
Since it’s a product configurator, we need to add it to the product next. To do that, we will add <kbd>src/Form/Type/ProductTypeExtension.php</kbd>:
This will add a configurator field to our product form. As you can see, it’s a resource autocomplete form which will need a little work to get working.
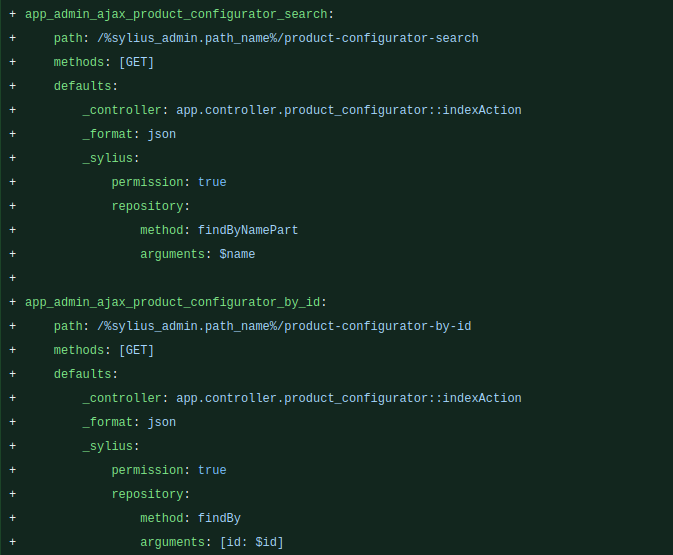
To get it to work, first we need to add Repository <kbd>src/Repository/Product/ProductConfiguratorRepository.php</kbd>:
This method will allow us to search for a configurator by its name. Now we can register the necessary endpoints:
Now to display it, we need to override the template <kbd>templates/bundles/SyliusAdminBundle/Product/Tab/_details.html.twig</kbd>:

For <kbd>remote_url</kbd> and <kbd>load_edit_url</kbd>, we’re using the endpoints we added previously. Now we should be able to add a configurator to any product we want:

Time to make an order
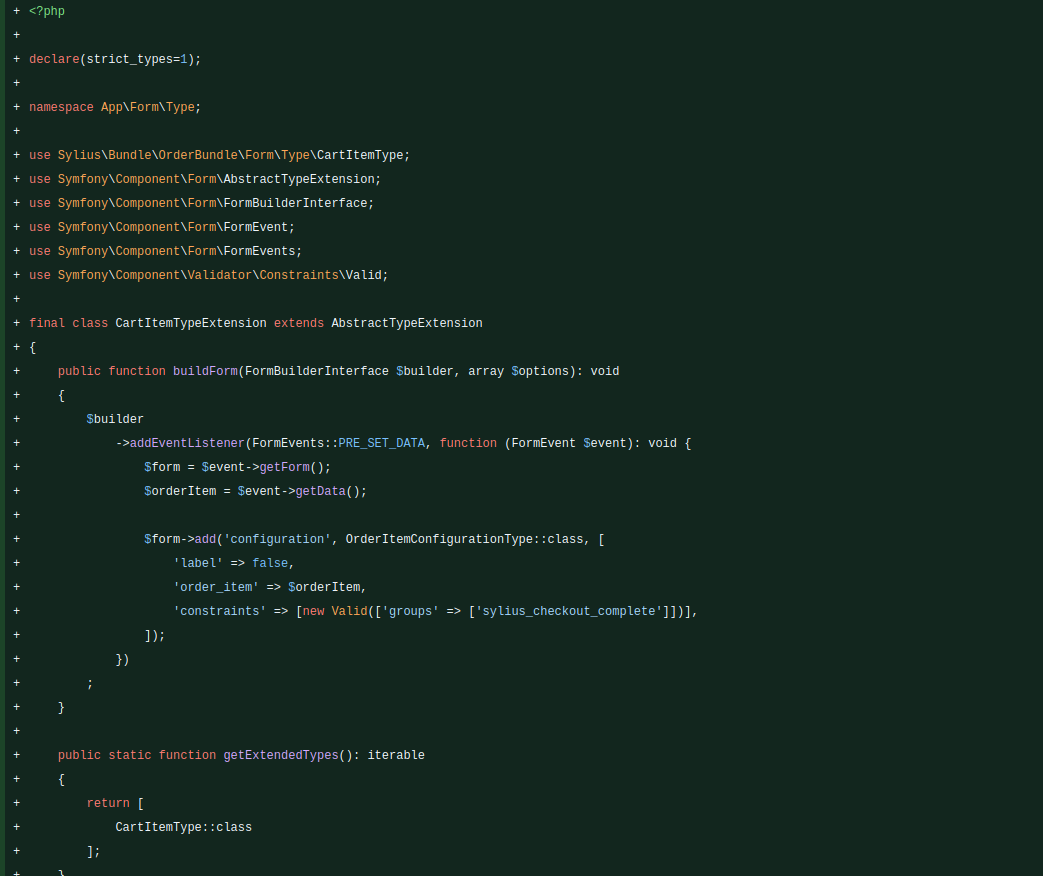
Since now we have everything we need on the backend to configure the configurator and add it to our product, we can finally use it on our website. To do so, we’ll be adding configuration to <kbd>OrderItemType</kbd> by creating <kbd>src/Form/Type/CartItemTypeExtension.php</kbd>:
As you can see, we’re adding a form type to our configuration field, which will store the entire configuration. We need to add it to a form event because we need to know if <kbd>CartItem</kbd> has a configurator attached. We’re still missing <kbd>OrderItemConfigurationType</kbd>, so we will add it next in <kbd>src/Form/Type/OrderItemConfigurationType.php</kbd>:

If you add more configurator options, you’ll need to add their type class accordingly with their type in the <kbd>getFormTypeForOption</kbd> method.
Now we need to hook up to a template event to display our new field. To do that, we will create <kbd>config/packages/sylius_ui.yaml</kbd>:

It points to a template that we need to create next, which will consist of only <kbd>{{ form_row(form.cartItem.configuration) }}</kbd>
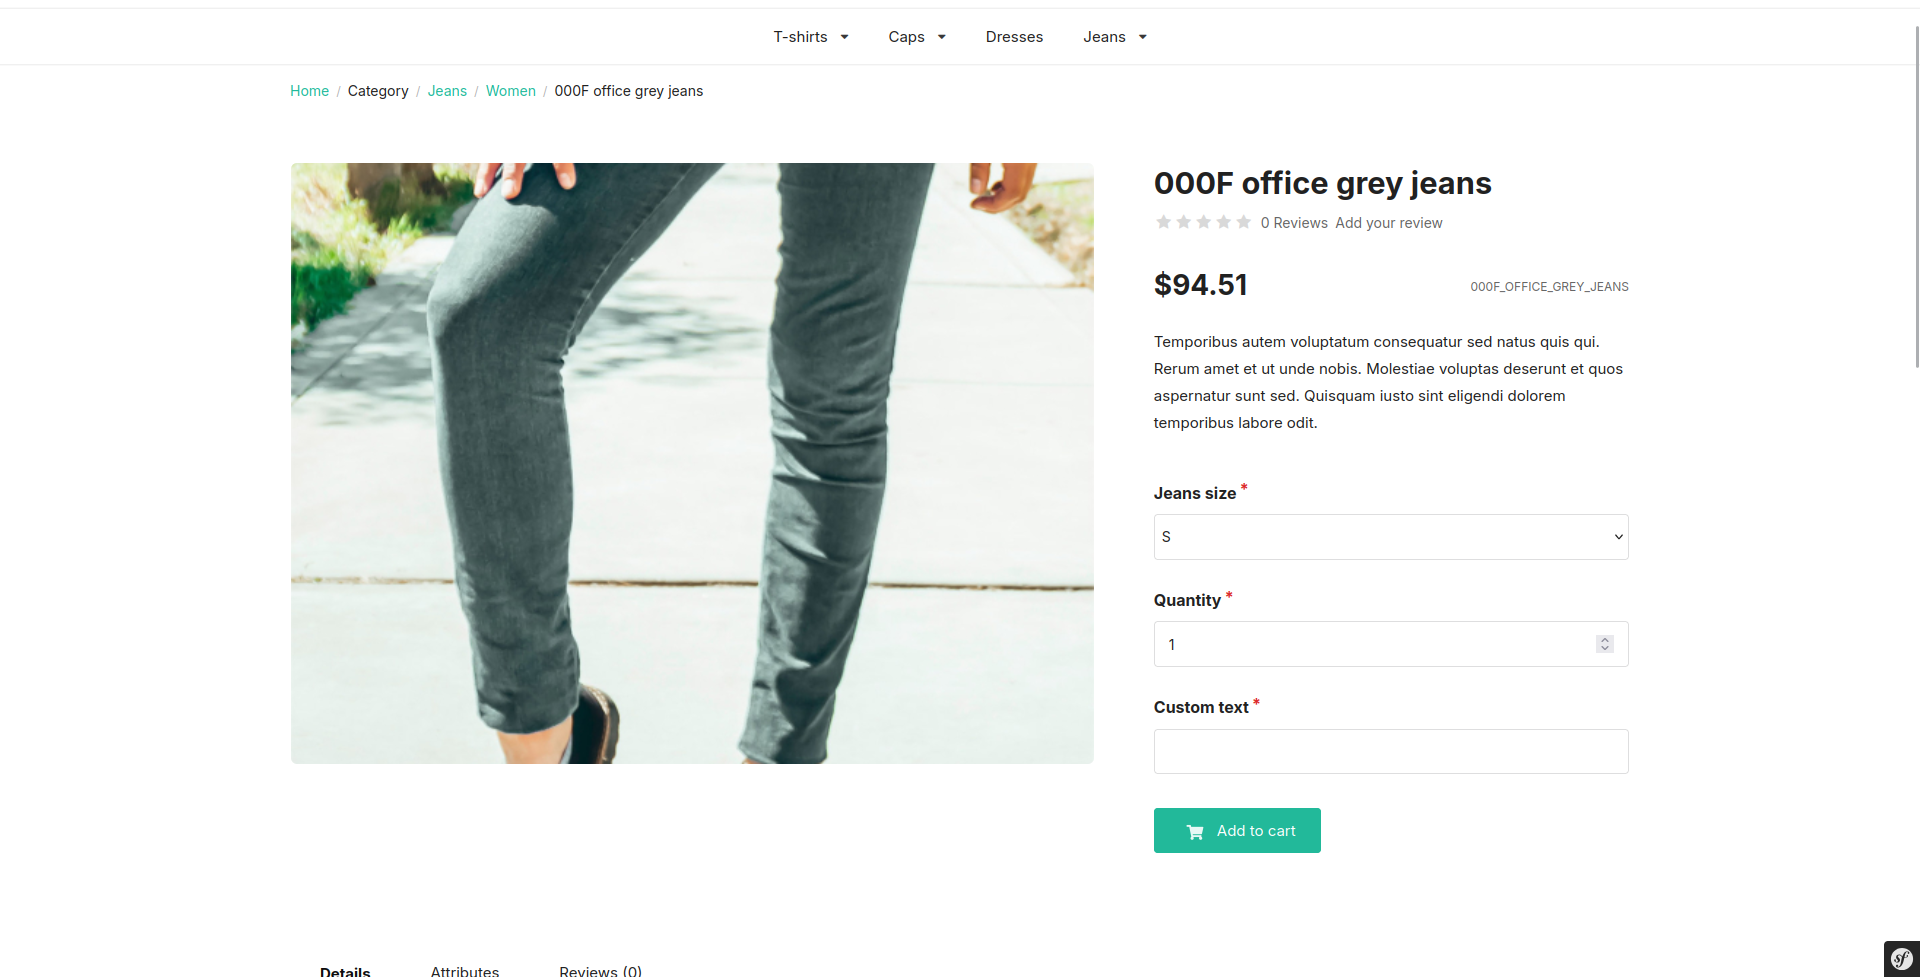
Now we should be able to see our field on the product:
Finally, we want to know what the customer has chosen, so we’ll add information in the cart and on the order page in the admin panel. To do so, we need to override two templates: <kbd>templates/bundles/SyliusAdminBundle/Product/_info.html.twig</kbd> <kbd>templates/bundles/SyliusShopBundle/Product/_info.html.twig</kbd>
In both cases, the code is the same, which we’ll add at the end of the template:

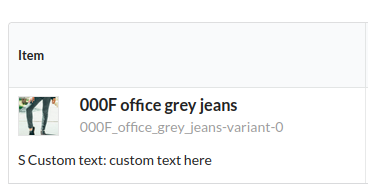
Under our product, we should see our configuration:
Summary
Building a product configurator might seem complex at first glance, but breaking it down into entities, forms, and templates makes the process much more manageable. We've created a solid foundation with the Text configuration type that demonstrates the core concepts - entity relationships, form extensions, service registration, and template integration.
The real power of this system lies in its extensibility. Adding new configuration types is as simple as creating new form classes and registering them with the service container. Need a file upload option? Create a <kbd>FileConfigurationType</kbd>. Want dropdown selections with dynamic pricing? Build a <kbd>SelectWithPricingConfigurationType</kbd>. The compiler pass we implemented automatically discovers and registers these new types.

