

Natively in Sylius, you can customize your storefront design in many ways. This article focuses on themes that are used to manage the appearance of each channel. Let's say you are creating a store that will have more than one sales channel and you would like each channel to look differently. In this example, I'll show you how to create a custom theme and then use it in a channel.
How to create your own theme?
The theme functionality is in a separate Sylius Theme Bundle repository, so you can install it in another project as well (but in the docs you will find more information about it). The Sylius Standard Edition has a theme bundle installed already. The first step you need to take is to enable themes in your project.
Find this file in your project (if it does not exist create it):
config/packages/sylius_theme.yaml
And then add the following lines.
sylius_theme:
    sources:
        filesystem:
            directories:
                 - "%kernel.project_dir%/themes"
Next, create a new directory tree in the themes directory:
themes/BlueTheme
then create a "composer.json" file in a new theme folder:
themes/BlueTheme/composer.json
with the following code
{
    "name": "bitbag/blue-theme",
    "authors": [
        {
            "name": "Dan Smith",
            "email": "dan.smith@example.com"
        }
    ],
    "extra": {
        "sylius-theme": {
            "title": "Blue Theme"
        }
    }
}
To install a created theme you need to run both of the following commands:
bin/console assets:install
bin/console sylius:theme:assets:install
<div class="rtb-text-box is-blue-50">Do you want us to help you with Sylius themes? Contact us</div>
How to overwrite a template only in one of the themes?
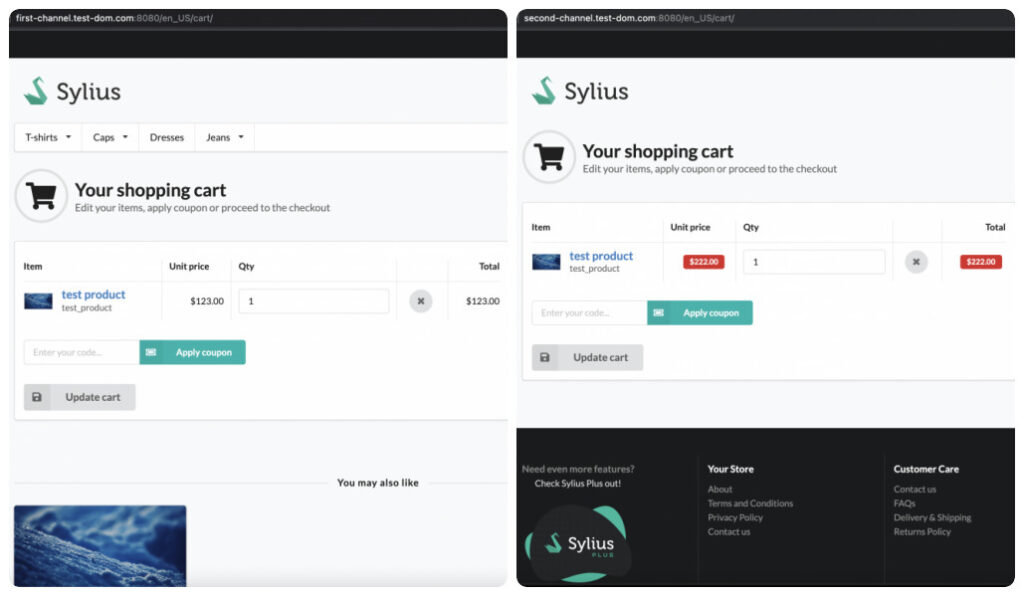
Let's say that in the shopping cart view in one of the channels the "You may also like" section should not be displayed, additionally we want to add labels to the product prices in the shopping cart table.
The only thing left is to create custom HTML files in the "BlueTheme" folder. We need to find the template files that we want to overwrite. In our case:
vendor/sylius/sylius/src/Sylius/Bundle/ShopBundle/Resources/views/Cart/Summary/_item.html.twig
Copy the content of this file and paste it into the location:
themes/BlueTheme/templates/bundles/SyliusShopBundle/Cart/Summary/_item.html.twig
With the following code:
{% import "@SyliusShop/Common/Macro/money.html.twig" as money %}

{% set product_variant = item.variant %}

<tr {{ sylius_test_html_attribute('cart-product-row', item.productName) }}>
    <td class="single line" {{ sylius_test_html_attribute('cart-item', loop_index,default(null) ) }}>
        {% include '@SyliusShop/Product/_info.html.twig' with {'variant': product_variant} %}
    </td>
    <td class="right aligned">
        {% if item.unitPrice != item.discountedUnitPrice %}
            <span class="sylius-regular-unit-price" {{ sylius_test_html_attribute('cart-product-regular-unit-price') }}>
                <div class="ui red horizontal label">
                    <span class="old-price">{{ money.convertAndFormat(item.unitPrice) }}</span>
                </div>
            </span>
        {% endif %}
        <div class="ui red horizontal label">
            <span class="sylius-unit-price" {{ sylius_test_html_attribute('cart-product-unit-price', item.productName) }}>{{ money.convertAndFormat(item.discountedUnitPrice) }}</span>
        </div>
    </td>
    <td class="center aligned">
        <span class="sylius-quantity ui form">{{ form_widget(form.quantity, sylius_test_form_attribute('cart-item-quantity-input', item.productName),sylius_merge_recursive({'attr': {'form': main_form}})) }}</span>
    </td>
    <td class="center aligned">
        <form action="{{ path('sylius_shop_cart_item_remove', {'id': item.id}) }}" method="post">
            <input type="hidden" name="_method" value="DELETE" />
            <input type="hidden" name="_csrf_token" value="{{ csrf_token(item.id) }}" />
            <button type="submit" class="ui circular icon button sylius-cart-remove-button" {{ sylius_test_html_attribute('cart-remove-button', item.productName) }} ><i class="remove icon"></i></button>
        </form>
    </td>
    <td class="right aligned">
        <div class="ui red horizontal label">
            <span class="sylius-total" {{ sylius_test_html_attribute('cart-product-subtotal') }}>{{ money.convertAndFormat(item.subtotal) }}</span>
        </div>
    </td>
</tr>
The second template is:
vendor/sylius/sylius/src/Sylius/Bundle/ShopBundle/Resources/views/Cart/Summary/_suggestions.html.twig
Simply paste an empty file:
themes/BlueTheme/templates/bundles/SyliusShopBundle/Cart/Summary/_suggestions.html.twig
How to use a custom theme?
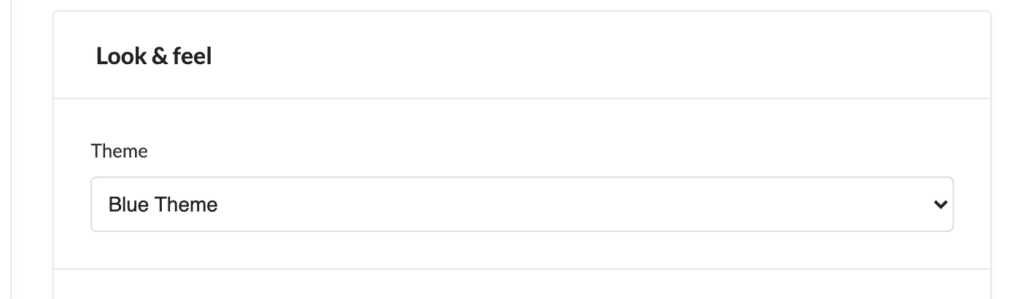
Now you can use this layout in the admin panel channel configuration.
Create new or edit Channel: go to Admin panel -> Channel -> [Create/Edit] and select "Blue Theme" in "Look & feel -> Theme"
After implementing these changes you should see different cart views in the channel for which the "Blue theme" template has been chosen. if you don't see any change after page refreshing, try clearing cache by Symfony command:
bin/console cache:clear
Finally, you should see:
Remember that you can always simply override a template instead of implementing a new theme.
<div class="rtb-text-box is-blue-100">See the Sylius documentation for more information on the Sylius theme and Sylius templates. If you have any doubts, feel free to contact us.</div>

