

API Platform – is it worth it?
Is it possible to build a functional REST (Representational State Transfer) application within a couple of minutes? Read our article and find out how you can do it.
Introduction
API Platform was launched in 2015 by the Symfony expert – Kevin Douglas. The framework has been released at the SymfonyCon in Paris and shocked the community turning out to be one of the most important software premieres alongside Platform.sh and Blackfire.io.
API Platform has been built using PHP and Symfony framework. During the new REST project development, we have to put a lot of work into the entire process – especially at the beginning. API Platform has been created to make it easier and quicker.
Getting started
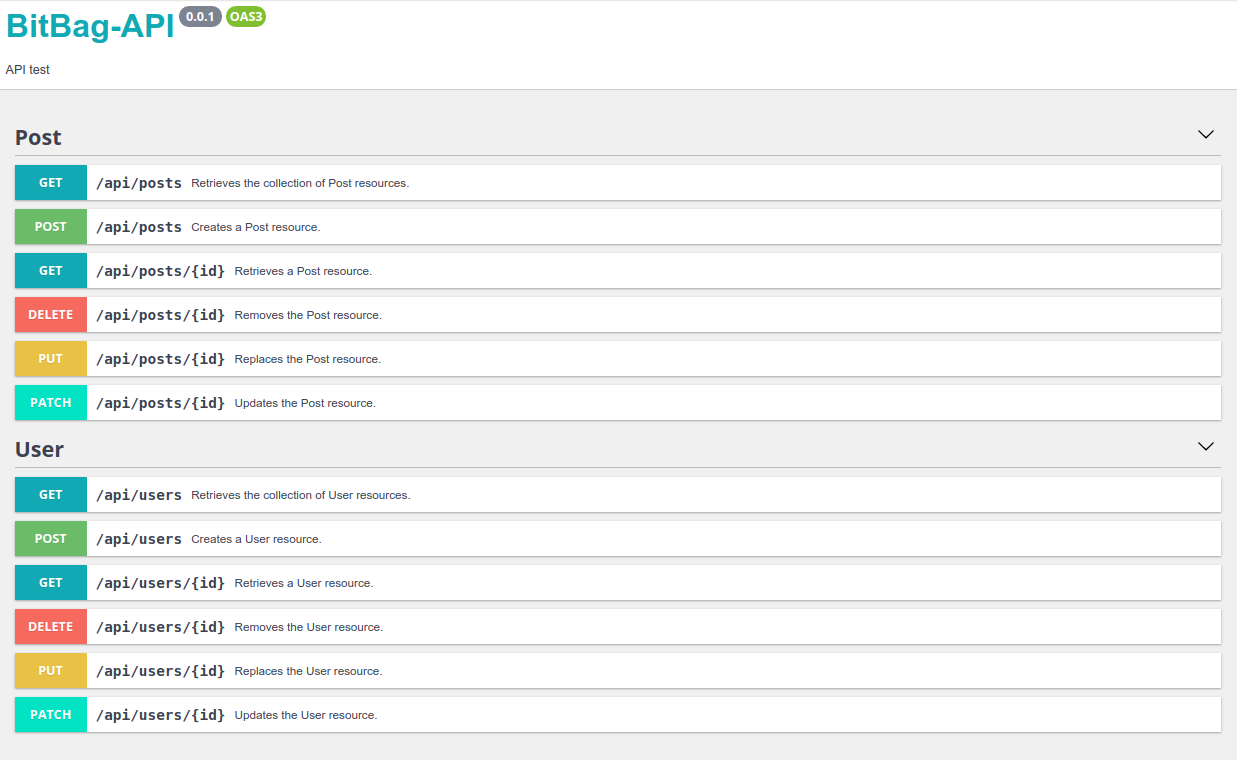
API Platform installation process is very simple. You just need to run the command ‘composer require api’ in your current project. After framework installation, enter the link: 127.0.0.1:8000/api, and then the welcome panel should appear. This panel allows you to display all current endpoints with the ability to test them and generate their documentation using ReDoc.

Implementation
Adding an entity
At the beginning, let’s create a new user account and add the fields shown below.
- src/Entity/User.php
class User implements UserInterface, UserApiInterface
{
    /** @var int */
    private $id;

    /** @var string */
    private $name;

    /** @var string */
    private $email;

    /** @var string */
    private $password;
To ensure that our user is not lonely, let’s add posts in relation to many-to-one. Our post should have fields like the example below.
- src/Entity/Post.php
<?php

declare(strict_types=1);

namespace AppEntity;class Post implements PostInterface
{
    /** @var int */
    private $id;

    /** @var string */
    private $description;

    /** @var DateTime */
    private $dateTime;

    /** @var UserApiInterface */
    private $userPost;
API Integration
After adding a user account and posts, let’s create its API Platform implementation. At first, indicate where the configuration will be stored.
- config/packages/api_platform.yaml
mapping:
paths:
       - '%kernel.project_dir%/config/api_platform'
Add two files with a simple configuration.
- config/api_platform/user.api.yml
AppEntityUser:
- config/api_platform/post.api.yml
AppEntityPost:
Then, refresh the page 127.0.0.1:8000/api, and the first CRUD application with all endpoints should appear. It is so simple, isn’t it?
Now we can check what new routes have appeared in the console.
php bin/console debug:router
Database
Another step is to configure the MySQL database. Insert into the env.local file parameters such as user name, password, and at the end name of the database.
DATABASE_URL=mysql://root:[email protected]:3306/api_platformWe run two commands in the terminal in turn.
php bin/console doctrine:migrations:diff

php bin/console doctrine:migrations:migrate
Afterward, we got a complete database with the user and post table. Now install the orm-fixtures in order to generate the required testing data. Then, run a command:
composer require orm-fixtures --dev
Add a user’s test data.
- src/DataFixtures/ApiFixtures.php
class ApiFixtures extends Fixture
{
    private $passwordEncoder;

    public function __construct(UserPasswordEncoderInterface $passwordEncoder)
    {
        $this->passwordEncoder = $passwordEncoder;
    }

    public function load(ObjectManager $manager)
    {
        $this->loadUsers($manager);
        $this->loadPosts($manager);
    }

    public function loadUsers(ObjectManager $manager)
    {
        $user = new User();
        $user->setEmail('[email protected]');
        $user->setName('test');
        $user->setPassword($this->passwordEncoder->encodePassword(
            $user,
            'secret'
        ));
        $manager->persist($user);
        $manager->flush();
    }

    public function loadPosts(ObjectManager $manager)
    {
        $userRepository = $manager->getRepository(User::class);
        $user = $userRepository->findOneBy(['name' => 'test']);
        $post = new Post();
        $post->setDateTime(new DateTime('now'));
        $post->setDescription('Some description');
        $post->setUserPost($user);
        $manager->persist($post);
        $manager->flush();
    }
}
Then, run a command in the terminal to save data in a database.
php bin/console doctrine:fixtures:loadAt this step, we have to test our endpoints. To this end, enter the link: 127.0.0.1:8000/api in your browser. In this case, we will download all posts.
